Hello XR Developers! Today, we’re diving into a feature you’ve all been eagerly anticipating: access to the Meta Quest Passthrough Cameras, now unlocked with Horizon OS v74. This new API lets you tap into the raw RGB camera feeds on Quest headsets—perfect for real-time environment sampling, AR overlays, and even object detection. In this guide, we’ll break down the essentials from Meta’s Passthrough Camera Samples GitHub repo, walk you through handling permissions and utility functions, and then build a simple color picker together. Let’s get started!
Check out loads of useful samples in the QuestCameraKit GitHub repo or the official Meta PassthroughCameraSamples. The official documentation can be found here.
Getting Familiar with the Basics
Meta’s latest update opens up a whole new realm of possibilities:
- Raw Camera Feeds: Gain access to the unobstructed view from the forward-facing RGB cameras.
- Experimental API: Currently exclusive to Quest 3 and Quest 3S running Horizon OS v74 or higher.
- Feature Highlights: Use cases include environment sampling, AR overlays, and object detection.
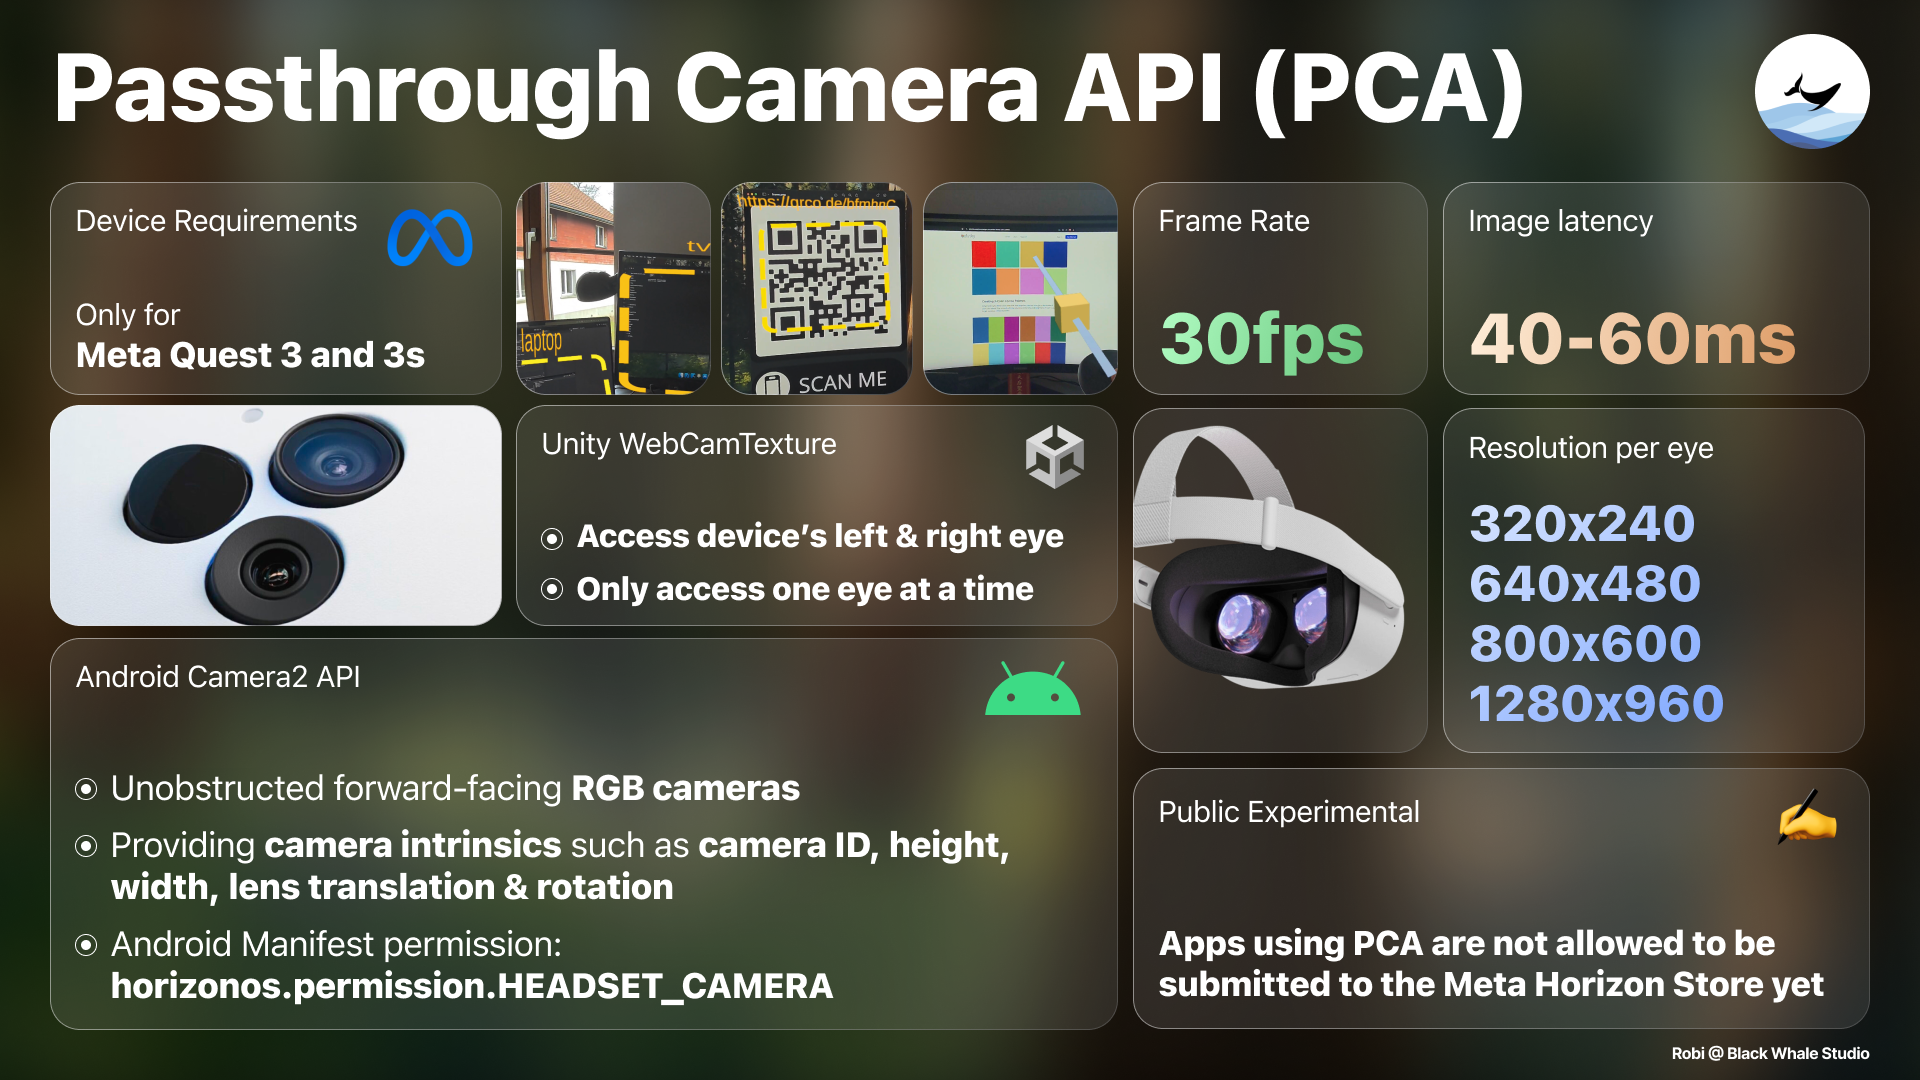
Understanding Limitations & Permissions
Before jumping into the code, let’s cover some crucial details:
- Device Support & API Status:
- Exclusive to Quest 3 and Quest 3S.
- The API remains experimental, meaning apps using it are temporarily excluded from Oculus Store submissions.
- Camera Access Details:
- You can access a list of webcam devices via Unity’s
WebCamTexture, but only one passthrough camera (left or right) is available at a time. Switching requires disabling and re-enabling the camera manager component. - Unity’s implementation lacks image timestamp support, which may introduce a slight 40-60ms latency and some misalignment.
- You can access a list of webcam devices via Unity’s
- Permissions:
- Essential permissions include the standard Android camera access (
android.permission.CAMERA) and Meta’s custom permission (horizonos.permission.HEADSET_CAMERA). - Be sure to add these permissions to your Android Manifest (a fully set up Manifest is available in both the official samples and QuestVisionKit).
- Essential permissions include the standard Android camera access (
Diving into the Passthrough Camera API & Samples
Meta provides several practical Unity sample scenes that illustrate different aspects of the API:
- CameraViewer Sample: Displays the basic camera feed on a Unity UI canvas.
- CameraToWorld Sample: Converts 2D camera image coordinates into real-world 3D positions using environment raycasting.
- BrightnessEstimation Sample: Dynamically adapts app logic based on real-world lighting conditions.
- MultiObjectDetection Sample: Integrates Unity Sentis and on-device ML with the YOLOv9 model for object detection.
- ShaderSample: Applies custom GPU shader effects directly to camera textures for creative XR visuals.
These samples serve as a great starting point to experiment and build more complex passthrough-based experiences.
Setting Up the Core Components
Let’s take a closer look at the key components you’ll be working with:
PassthroughCameraPermissions
This class handles all the heavy lifting for camera permissions:
- Permission Flow:
- On awake,
AskCameraPermissions()checks and requests the necessary permissions. - If granted, it logs “PCA: All camera permissions granted” and sets a flag to enable the camera feed.
- If denied, it logs a warning and prevents further initialization.
- On awake,
PassthroughCameraUtils
A static class packed with utility functions and camera intrinsics data:
- Device & OS Checks:
- Verifies you’re running on a Quest 3 or 3S with Horizon OS v74+.
- Camera Mapping:
- Functions like
GetCameraIdByEye()map the left/right passthrough camera to the corresponding Android camera ID.
- Functions like
- Intrinsics & Pose Data:
- Retrieves essential data such as focal length, principal point, maximum resolution, and sensor skew.
- Computes the camera’s pose in world space, which is crucial for later transforming 2D texture coordinates into 3D rays.
WebCamTextureManager
This script manages the camera feed itself:
- Initialization:
- Attached to a GameObject, it lets you select the desired camera (left or right) and resolution.
- It uses a slight delay before calling
Play()on theWebCamTextureto avoid Android’s Camera2 API quirks.
- Lifecycle Management:
- Ensures that only one instance runs at a time.
- Properly cleans up by stopping and destroying the
WebCamTexturewhen the script is disabled.
Building a Color Picker
Now for the fun part—creating a simple color picker that samples colors from the real world using the passthrough camera feed!
Modes of Operation
The Color Picker supports two sampling modes:
- Environment Mode:
- Use a controller or hand to cast a ray into the environment.
- A
LineRenderervisualizes the ray, and the system uses environment raycasting to detect surfaces.
- Manual Mode:
- Specify a fixed sampling point (such as a virtual pen tip) without using raycasting.
- The sampled color is then applied directly to an object’s material.
How It Works
- Reference Setup:
- Grab the main camera for screen-to-world calculations.
- Retrieve references to the
WebCamTextureManagerand Meta’sEnvironmentRaycastManager.
- Sampling Process:
- In Environment mode, a ray is cast from a specified origin, and the hit point is stored.
- In Manual mode, a fixed transform provides the sampling point.
- When you press the designated controller button (e.g., A), the script:
- Converts the world-space hit point to texture UV coordinates.
- Samples the color from the camera feed.
- Adjusts the brightness based on nearby pixels.
- Applies the resulting color to the target material.
- Coroutine & Delays:
- The script waits until the
WebCamTextureis playing before attempting to sample, ensuring a smooth initialization.
- The script waits until the
Conclusion
With Horizon OS v74 and Meta’s new Passthrough Camera API, accessing and utilizing raw camera feeds on Quest devices has never been more exciting. Whether you’re building a color picker, diving into object detection, or experimenting with AR overlays, the tools and samples provided open up endless creative possibilities for XR experiences.
If you enjoyed this guide, be sure to check out Meta’s official samples as well as my QuestVisionKit project for more advanced prototypes. Leave a like, subscribe, or join our XR developer community on Discord for more updates and tutorials. Happy developing, and see you in the next post!
Support Black Whale🐋
Thank you for following this article. Stay tuned for more in-depth and insightful content in the realm of XR development! 🌐
Did this article help you out? Consider supporting me on Patreon, where you can find all the source code, or simply subscribe to my YouTube channel!